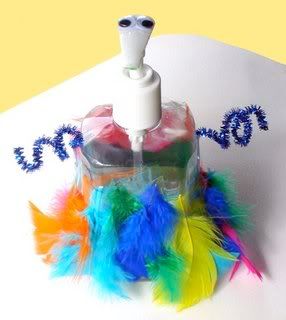
What is "The Green Art Box?" A collection of environmentally friendly kids' art projects that are; clever, imaginative
and easy-to-create! Inspired by the reuse of common household recyclables! A handy resource for teachers, parents
and home-school art curriculums. Create "green" art today!  © 2009 Broken Box Designs™

Showing posts with label for my room. Show all posts

Monday, September 8, 2008

Trinket Tin


PROJECT OVERVIEW:
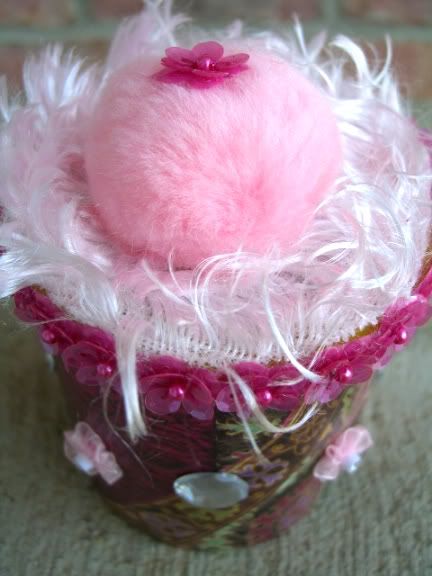
This project has many decorating possibilities! The goal is to convert an empty food tin/canister into a decorative "Trinket Tin" that might keep jewelry, coins, and other trinkets.
TIP: Consider following a theme for your tin to express yourself! For example, if you like cats you could find cat pictures in magazines and glue them to your canister. :) 
Have fun - ANYTHING GOES!!!!

SUPPLY LIST:
- empty tin canister and lid (roughly small peanut size)
- scrap papers
- scrap embellisments (glitter, sequins, stickers, buttons, etc)
- ribbon/bow, etc
- glue or double sided adhesive tape (scrapbooking dots)
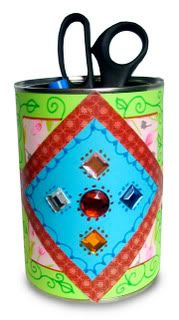
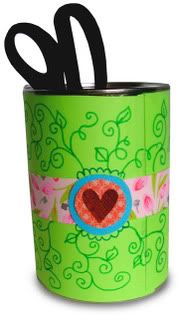
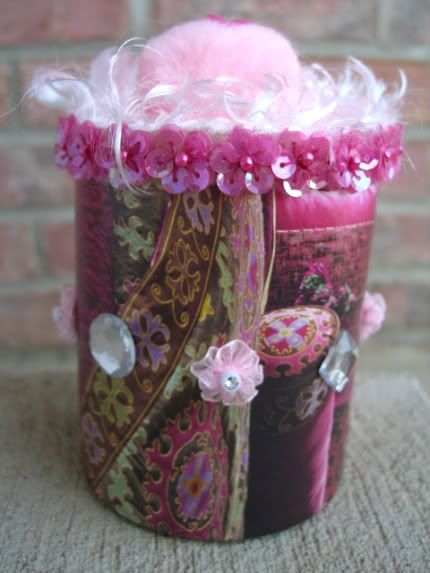
DIRECTIONS:
1) Rinse out your tin and lid.

2) Cover the entire outside of tin/canister with scrap papers (using glue or tape). Be creative, there are many ways to cover the tin such as: wrapping with paper, covering with torn paper scraps, etc.

3) Further decorate your Trinket Tin with found embellishments such as: glitter, sequins, stickers, buttons, etc.

4) Decorate the lid with some sort of "topper" such as a bow or ribbon. Be creative, again...anything goes!

5) Set your Trinket Tin aside to dry.

6) When dry, fill with trinkets for safekeeping. Perfect for your bedroom dresser :)

Wednesday, July 30, 2008

Torn Paper Monogram Wall Art


Create modern art to decorate your room with a personalized touch! Easy, quick and fun to do!

SUPPLY LIST:
- scrap papers (old magazines, junk mail, newspaper, etc)
- glue
- backing paper (stiffer construction paper, cardstock, etc)
This can be in whatever size you want your monogram to be, letter size, poster size... as big or small as you like!

DIRECTIONS:
1) Select the backing paper you will create your monogram on. Again, make this whatever size you like! Consider cutting a big scrap piece of cardboard into a fun shape like a star or circle... be unique!

2) Using pencil, sketch out the letter for your monogram. Try bubble letters, block, even cursive. Do your first initial, last or all three!

3) Gather scrap papers (old magazines, junk mail, newspaper, etc) to tear pieces of paper from and build your monogram.
Tip: Your monogram will stand out more if just 2 colors are used.


4) Tear uniform scraps from your scrap papers roughly 1" x 1" in size and set aside to use in your design.
Tip: Sort your pieces in color piles, one for your letter and one for the background color.


5) Apply a thin layer of glue to your backing paper.

6) Start adhering torn papers to your monogram, keeping in mind your letter should be a different color scheme from the background. Continue until your entire backing paper is covered.

7) Set aside to dry.

8) When dry, find a fun place to hang... maybe above your bed or on your bedroom door. :) You might even want to frame for a professional look!

Friday, February 1, 2008

(Soap Pump) Creatures


©2007 Broken Box Designs™

This is a super easy, unique kids' art project that recycles empty soap pumps into a useful soap pump/lotion bottle for kids! Below is all the information needed to get started!

SUPPLY LIST:
- empty soap pump/bottle (plastic)
- colored craft feathers
- 1 pipe cleaner
- 2 wiggly eyes
- clear packaging tape -or- hot glue gun (with parent supervision)
- glue
- (optional) foam plate or clean empty container

STEPS:
1) Rinse out an empty soap bottle pump and peal the labels off sides if possible.
2) Select medium sized (2-3 inches long) colored craft feathers to cover your bottle.
3) Tape feathers around the plastic sides of your bottle with clear packing tape. Adhere feathers as far up the bottle as you wish and have fun creating a colorful feather pattern!
4) To create arms...cut pipe cleaner in 1/2. Bend about a 1/2" of pipe cleaner to 90 degree angle, and twist the remaining length around your finger or a pencil to create twirl.
5) Tape the short straight part of pipe cleaner to bottle (wherever you would like your creature's arms).
6) Glue 2 wiggly eyes to top of pump with small dots of glue. Set aside to dry.

WANT TO GO A STEP FURTHER?:
7) Use a foam plate or empty clean empty foam container to create feet for your creature! Simply cut out 2 feet shapes and tape to the bottom of bottle.
8) Add some hair to your creature by taping a little feather, ribbon, or yarn behind wiggly eyes on pump.

Have fun, use your imagination & BE CREATIVE!

Funky Pen & Pencil (Coffee Can) Container


©2008 Broken Box Designs™

New Year's Resolution: "Get Organized Kids!" Eliminate clutter and organize your desk with these fun to make pen/pencil containers. Plus, ad a little pizzaz to your desk with bright colors and shiny embellishments!

SUPPLY LIST:
- empty coffee canister (was with soap before using)
- scrap paper (from magazines, catalogs, junk mail, construction paper, etc)
- washable markers
- tape or double sided adhesive dots (find in scrapbook aisle)
- plastic beads, rhinestones, buttons, or any other fun embellishment

STEPS:
1) Peel off coffee label if possible and clean canister w/soap and water. Towel dry.
2) Pick a fun colored paper or patterned paper and cut a piece of paper to wrap around canister as covering. Tape one end of the paper to the other to secure in place. Glue also works on the canister to secure, but is a little messy.
3) Decorate outside by taping fun colored papers, patterns, shapes, and decals to canister. Be creative and remember that anything works! Have fun mixing funky colors and patterns to create a unique piece of art!
4) Finish off your design with little buttons, rhinestones, glitter, yarn, beads or whatever else you want!
5) Doodle designs, your name maybe? with colorful markers or crayon. This really adds that unique touch!
6) Finished! Now just toss in your pens, pencils, sissors, etc and plaace this on your desk to stay organized.

Have fun!! :)