What is "The Green Art Box?" A collection of environmentally friendly kids' art projects that are; clever, imaginative
and easy-to-create! Inspired by the reuse of common household recyclables! A handy resource for teachers, parents
and home-school art curriculums. Create "green" art today!  © 2009 Broken Box Designs™

Saturday, October 25, 2008

Nature Embellished Owl


PROJECT OVERVIEW:
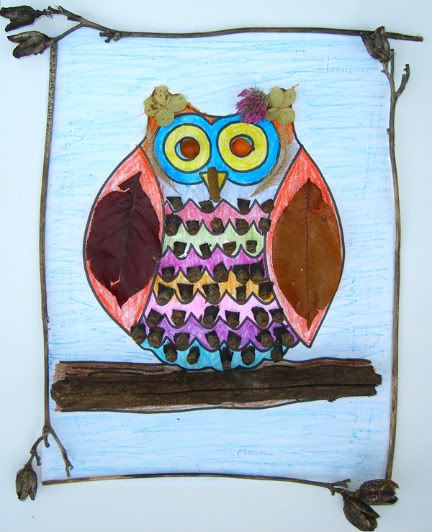
To print out the owl listed in Supply List and decorate it with natural items found on a nature hunt.

SUPPLY LIST:
- download your FREE owl.pdf
- 1 sheet letter sized paper
- 1 sheet of cardboard or card stock that is larger than letter size
- glue (Elmer's or Tacky)
- scissors
- crayon, marker and or colored pencils
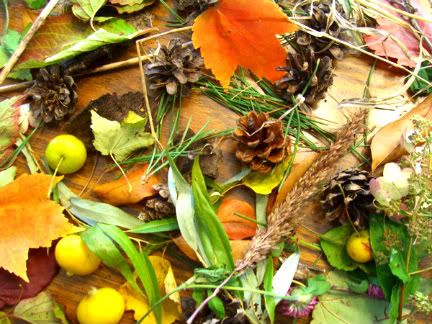
- pine cones, small twigs, pine needles, acorns, leaves & other small natural elements to decorate your owl

DIRECTIONS:
1) Download your FREE owl.pdf and print on a letter sheet of paper.

2) Glue the owl printout onto a thicker backing such as cardboard. Lay a heavy book on top of this so it dries flat w/out any wrinkles. (set aside to dry)

3) Go outside on a nature walk and collect pine cones, leaves, twigs and other items to decorate your owl.

4) Bring your items inside. Color your owl with crayon, marker and or colored pencil.

5) Then add natural embellishments to your owl by gluing them down on top of the paper.

6) Decorate your entire owl with natural elements, trying to decorate him with as much nature as you can!

7) Set aside to dry. Then hang up for some lovely Fall decor!

Tuesday, October 7, 2008

Leaf Silhouettes


PROJECT OVERVIEW: For kids 10+
Abstract Art: art that does not attempt to represent external, recognizable reality but seeks to achieve its effect using shapes, forms, colors, and textures.

Silhouette: the dark shape and outline of someone or something visible against a lighter background

Contrast: enhancement of the apparent brightness or clarity of a design provided by the juxtaposition of different colors or textures.

SUPPLY LIST:
- BIG piece of scrap cardboard roughly poster size (16x20).
- pencil
- 2 different contrasting colors of acrylic paint (1 light color and 1 darker color).
- paint brush and rinsing cup/paper towels
- sunny day with shadows (mornings and late afternoons work best)

DIRECTIONS:
1) Find a large piece of cardboard/matt board, as described above.

2) Choose 2 different paint colors to use (again, 1 light and 1 dark).

3) Paint your entire piece of cardboard with the lighter of your 2 colors. Let dry (acrylics dry fast but this could be done in 2 days if in a classroom).

4) When your base color is dry, take cardboard and pencil outside. Find a shadowy spot under a tree that has good leaf/branch shadows on ground. Lay your cardboard on ground so that shadows cover it and overlap across it.

5) Lightly trace the silhouette of tree/branch shadows on your cardboard. *NOTE: just trace the OUTLINE of shadows, it might not look like individual leaves to you, just COPY the shadows. **TIP: trace rather quickly, so that the sun/shadows don't move :)

6) When you are finished tracing shadows, bring everything inside and PAINT the shadows in with your darker paint color.

7) Let dry and you're done! You've made your own exclusive abstract print!